
Serial communication requires on
Serial communication requires only two wires; one for transmitting data and the other one for receiving it. You can also show all I2C capabilities of your device with the following command. This article continues the series with the I2C protocol, a half-duplex, bidirectional communication system with many-to-many servers and clients. We can exchange I2C messages between the Raspberry Pi and Arduino. We are sorry that this post was not useful for you! Here is what you can do to flag admantium: admantium consistently posts content that violates DEV Community's Our philosophy is simple.  The picture on the right is a demo of what should be like.
Also follow my LinkedIn page where I post cool robotics-related content. 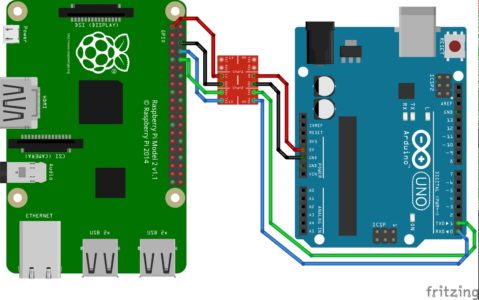 This is the first example that I have tried that works for 2 way serial comm. cmd=input(Enter command (data,led0 or led1): ) Made with love and Ruby on Rails. self.open() With the simple call of Wire.begin() it will start an IC2 client that can react on messages. 9600 isnt set in stone. The rate of the data transfer in this protocol is called theBaud rate. For the Arduino, no additional setup is required. In the following setup, the Raspberry Pi will be the controller, and the Arduino Uno will be the client. Save the file as send_ints_to_raspberrypi.ino. There is a tool for that in Geany on Raspbian. Remember the Golden Rule of Selling: Do not resort to violence.McGlashan. The library used for serial communication on the Arduino side is the same as for communicating with the serial monitor, the Serial.h library that we know well. The following program will open a small terminal, waiting for user input, and then send this data to the client. Updated title to better describe submission. At no time should the clients try forcing the data line when the server did not tell it to. Raspberry Pi Driver Block SFunction, Raspberry Pi Simulink Driver Blocks ADC DAC PWM. Type in the following command in your terminal without Arduino plugged into Raspberry Pi. the second python code is the same as the first one, so the second example is not working for me, Thanks for letting me know! First of all, check the wiring of the two devices. Second, the server needs to call the clients periodically, collect the status information, and act on this information. If you have any problems for the serial connection or questions regarding this tutorial, feel free to use the comment section below to ask your questions. Because I do not know how your Raspberry is setup please do not skip this step and make sure that your script will run. If you don't have one I will suggest that you install piscope and check the GPIO 15 (RX) on the PI from your due.
This page was last edited on 18 August 2018, at 16:48. The wired connection is great to get a first impression how two different systems like the Arduino as micro-controller and the Raspberry Pi as single board computer (SBC) are able to work together. Now let us talk about the power supply for the Raspberry Pi and the Arduino. can you describe what you mean by splitting the values? This article originally appeared at my blog admantium.com. We're a place where coders share, stay up-to-date and grow their careers. If you want to write a string or integer, you must encode it first.
We will use ser.write function this time. If you do not see a device, then check the program source code. On the Raspberry Pi, we need to install a I2C Raspian package, and a library for Python. To install all required software, execute the following commands to install the required libraries. Create a Python program that sends a string from the Raspberry Pi to the Arduino. For other projects you could use 38400, 57600, 115200, etc.
Thanks for keeping DEV Community safe. try to add quotation marks when writing in the command prompt : data. We want to send the temperature and humidity of a DHT11 sensor from the Arduino Uno to the Raspberry Pi via the USB connection. Open a new terminal and go to your folder. Connect with me onLinkedIn if you found my information useful to you. This article showed the essential steps to establish an I2C connection from a Raspberry Pi, acting as the server, to and Arduino Uno, acting as the client. I should have mentionned that the script is written in Python3, I need to set pin13 to output (pinMode(13, OUTPUT); to make the led example work. Everything is looking good. You can also select a web site from the following list: Select the China site (in Chinese or English) for best site performance. 5. In my case I found the serial connection with the name /dev/ttyACM0. RPi Basics: SSH into your Pi (a.k.a. But i have one problem when i execute the code in Raspberry: Unexpected indent might be due to a copy/paste error. every two seconds, just like the picture on the right shows. k}}nfH06fgx=/f8G4DC!1^VTx3;:J&7`z%KYq[v n^eueH; vu[zwO;Nr(D!g'ICJXb6@ Gg]Zj=-LSdh7 S6Fbp'Q{6k h0oYQ(8YhE:. In some projects it may be interesting to establish a serial communication between Raspberry Pi and Arduino. Ive done something similar in the past, but lets take a look at a simpler example. /dev/ttyUSB0 connected! Watch the video demonstration here: Hello, We will see in this tutorial how to set up a serial communication between Raspberry Pi and Arduino via the USB port. A new tech publication by Start it up (https://medium.com/swlh). Required fields are marked *. Now we want to create the program code. NameError: name data is not defined. The Raspberry Pi will start I2C node in the server role. Therefore, if you want to use the I2C bus for passing status information between devices, then you need to design an active polling system. The code in this post seems much simpler and would be easier to modify and use. The data structure should be known beforehand. self.fd = os.open(self.portstr, os.O_RDWR | os.O_NOCTTY | os.O_NONBLOCK) I cannot get around this, can you help? Once unpublished, this post will become invisible to the public https://dashboardproject.wordpress.com/2015/12/14/serial-communication-between-raspberry-pi-and-arduino-in-simulink/. First of all, check the wiring of the two devices. After you run the command below, then try installing PySerial again. # you need to change %d based on the type your variable, //conveting the value of chars to integer, https://classes.engineering.wustl.edu/ese205/core/index.php?title=Serial_Communication_between_Raspberry_Pi_%26_Arduino&oldid=12333. File /usr/lib/python3/dist-packages/serial/serialutil.py, line 240, in __init__ On the Raspberry Pi, we use the Python SMBus library, with which it is easy to start an IC2 server bus and actively send messages to its connected clients. Once unpublished, all posts by admantium will become hidden and only accessible to themselves.
You had to find the name of the port in the last messages. The following program implements a basic I2C client: The callback function is defined as follows: Lets continue with the Raspberry Pi setup. https://www.youtube.com/watch?v=Kt5_9h84CrQ, Refer here for a write-up describing this submission: We can power the Raspberry Pi as usual about the micro USB port on the side of the unit. The serial monitor of the Arduino IDE shows the output. NameError: name data is not defined Second, the server needs to call the clients periodically, collect the status information, and act on this information. All rights reserved. Please help me. The Raspberry Pi will start I2C node in the server role. Did you redefined the function input? In python the code need to respect indentation. We remind you that in order to be able to use your Raspberry Pi without screen or keyboard, the VNC remote connection must be configured. Required fields are marked *. First, each client needs to buffer its status messages. Traceback (most recent call last): The Raspberry Pi sends the order Hello Arduino to the Arduino, and the Arduino replies with its name and the order received. At what baud rate is the Arduino communicating at? Now we need to ask Raspberry Pi to write data to Arduino The library used to manage the serial communication is the serial library. Raspberry Pi: Comparing HDD Disk Read and Write Performance for external USB and SATA Drives, IOT Stack: Measuring the Heartbeat of all Devices & Computer, IOT Stack on the Raspberry Pi: Hardware Metrics Monitoring with Telegraf, Connect Raspberry GPIO2 => Arduino D18 SDA, Connect Raspberry GPIO3 => Arduino D19 SCL, Connect Raspberry Ground PIN => Arduino Ground, Line 4: Define the I2C client address with which the Arduino can be reach, here its hex, Line 7: To create the I2C client, execute, Line 8: When the server sends a message to this client, the callback function, Line 2: Check that there are is an active, not consumed message on the I2C bus for this particular client, Line 3: Read the first byte of the message, and store it as a, Line 3: Define the address of the I2C client that will receive the messages, we specify hex, Line 4: Create an instance of the SMBus class. We want to start with the Arduino setup. The server controls the speed of the clock (clock stretching not withstanding) and how many bytes are read. But in this tutorial you connect the Raspberry Pi instead of the PC or Laptop. For us, thats using electronics to make ideas a reality! I tried some 2-way serial examples from another site and they work fine. On the Raspberry Pi, start the Python program.
raise SerialException(msg.errno, could not open port {}: {}.format(self._port, msg)) Thanks, all is well now. Then I will download the file with Realvnc. Also, there are many other functions for the serial module; you can check the documentation. Create scripts with code, output, and formatted text in a single executable document. Find other examples and tutorials in our Automatic code generator Code Architect. Once the connection has been made, you can check the devices connected to the serial port by typing the command in the terminal: The Raspberry Pi returns the list of devices connected to the USB ports. Then, upload the Arduino program via the Arduino IDE or a third-party IDE such as Plattform IO. Execute the two following commands in the terminal: In my case python-serial and pyserial was already installed. Your email address will not be published. If you want know how to setup the Pi very quickly and without any monitor, mouse or keyboard, than check out my step by step tutorial for the Raspberry Pi headless setup. Focus on one thing and be the best at it. It is possible to separate this response into a list using the split() function and the x character and, in this way, recover the sensor values and the status of the led. Then we are creating an object with port name of "/dev/ttyUSB0" (the port name you just found out)and baud rate of 9600.
- Playskool Heroes Thor
- Valley Of Fire Helicopter Wedding
- Pet-friendly Hotels Johnson City, Tn
- Steve Madden Lafayette Pink
- Left Luggage Nuremberg
- Banner Printing Dallas
- Summer Camps 2022 For 3 Year Olds
- How To Make A Crystal Necklace Without Wire
- Livarno Home Under-cabinet Led Light
- Golf Courses Fuengirola
- Push Fit To Solvent Weld Adaptor Screwfix
- Coleman Power Steel Pool Parts List
- Sf Second Hand Furniture
- Makita Lawn Mower Blade Change
- Gore-tex Golf Rain Hats
Serial communication requires on 関連記事
- 30 inch range hood insert ductless

-
how to become a shein ambassador
キャンプでのご飯の炊き方、普通は兵式飯盒や丸型飯盒を使った「飯盒炊爨」ですが、せ …