
Hi, i followed all the steps in
Hi, i followed all the steps in the video, but im not getting any LCD output.
In nickel oxide NTC thermistors, the charge carriers are electronholes. I am Hamza. An improvement regarding NTC temperature calculation if you use a 100k ohm resistor and a 100k ohm @25C NTC in the voltage divider: you should change values with the follows: float R1 = 100000; // 100k Ohm voltage divider resistor We also get your email address to automatically create an account for you in our website. You may have reached this page unexpectedly. Read our special supplement celebrating 60 years of Electronics Weekly and looking ahead to the future of the industry. I tried to do make the circuit with the Thermistor (81210W26)and had a strange problem. Connect the Vcc and ground pin to the 5V and ground of the Arduino Nano board and connect the OUT pin to A5 of Arduino. click the upload button to burn the code on your Arduino Nano board. Measure thermistors resistance with a multimeter and choose a resistor to match. LCD.write(128); delay(1000); For security, use of Google's reCAPTCHA service is required which is subject to the Google Privacy Policy and Terms of Use. Or if you prefer its (1023.0-RawADC)/RawADC which can directly be deducted from wiring the NTC to the 5V and R1 to the GND. LCD.print(T); // move cursor to Thus, it is simple to use one microprocessor to control many DS18B20s distributed over a large area. What do you get your wife for that occasion? I am having an issue with my thermistor outputting Fahrenheit as 198.73 at room temp I cannot seem to figure out what the issue is but it is calculating F to C correctly. As we have already made a list of components, let us move a step ahead and go through a brief study of the working of each component. only before line Number 8 put double slash (//) like that exmple via wikipedia you can find an online and offline calculator. They are classified bythe way their resistance responds to temperature changes. option enabled in File -> Preferences. Can I modify this code with my calibration equation? In the first code in the fifth line, here: Temp = log(10000.0*((1024.0/RawADC-1))); I dont understand why we have to use RawADC-1? How do you setup a chain of thermistors? The conducting material contains charge carriers that allow current to flow through it. I followed the instructions and put the same resistance as the thermistors resistance worth but the Temperature goes down instead to increase when I warm it up. If you get compiler error in the Arduino IDE, this means that you are missing at least one of the following libraries: https://github.com/adafruit/MAX31850_OneWire, https://github.com/adafruit/MAX31850_DallasTemp. The output voltage can be easily used to tell the temperature in Celcius. with a 220 ohm resistor).. so i assume the code cant handle R2 values below a certain resistance.. any idea if i need to change c1, c2, c3 values ? In addition, the DS18B20 can derive power directly from the data line (parasite power), eliminating the need for an external power supply. /tmp/cc8vrcYJ.o: In function `ThermistorC: I was planning on using A0, A1, A2, and A3 for 4 different temperature sensors. you can earn additional cash every month because youve got Tune into this Xilinx interview: Responding to platform-based embedded design. valC=analogRead(3); the only difference in the parts used is the thermistor. Hi Krissy, the operating temperature range for this thermistor is -50+260C. Thank you! delay(1000); Read the first ever Electronics Weekly online: 7th September 1960. Your R1 value in sketch reads 10000, shouldnt it be 100000 for a 100k resistor or am I missing something? Congratulations! Thank you very much for your help. Required fields are marked *. Check your inbox now to confirm your subscription. I have been using the same resistors and thermistor, what do you call the digital monitor that is small in the video. Contest. It appears you have the thermistor in the R1 position connected to 5V, but in your code comments you say R2 is the thermistor. /tmp/cc8vrcYJ.o: In function `ThermistorF: I dont want to use up the extra 2 digits and the decimal point, how do I tell it to stick to whole numbers? Here i am using NTC (negative temperature coefficient) thermistor p103. float c1 = 1.009249522e-03, c2 = 2.378405444e-04, c3 = 2.019202697e-07; // Attach the serial enabld LCDs RX line to digital pin 11 float c1 = 6.66082410500E-004; // Steinhart-Hart C1 Algebraicly you cant rearrange the 1st formula to get the 2nd. Did you make this project? They have a huge selection of high quality Raspberry Pi and Arduino parts! I was thinking along the lines of adding an if else statement with the following. tempC=ThermistorC(valC); Serial.print(Temperature = ); The Visuino: https://www.visuino.com also needs to be installed. How To Make A Digital Thermometer Using Arduino? Ive seen many other codes that will add the wifi ability but they dont show the proper temperature like this code does. I do not understand your equation for the resistance with the y and x. you use 100k ntc and 100k resistor. void loop() { Show verbose output during compilation Thanks a million for jogging my 70 year old mind back to ground level, it has been rather sluggish after sitting with my wonderful wife of 51 years as cancer took her from me, just 4 days after our 51st wedding anniversary. Hi, thanks for this help, because I can now read the temperature of a 3d printers hotbed with my arduino ! { I tried to invert the Thermistor and gained the knowledge that this doesnt effect it. I want to build a thermistor temp sensor using arduino (as in above circuit) but then need to convert measured temperature in degrees centigrade to air flow in meters per second, and be able to display on screen, and record this via computer. So on line 10 for LCD I did : Temp = (Temp 273.15)/2; and I had the normal value that was supposed to be.
What if I want to use more than one thermistor to sense different temperatures, say 10. Would appreciate any suggestions. How To Make A Digital Air Pollution Meter Using Arduino? We can manufacture this for you, how many pieces do you need? I built it with This part, as you part is out of stock: https://www.amazon.com/dp/B06XR1TG5N/ref=sspa_dk_detail_2?psc=1. Connect the thermistor and resistor to your Arduino like this: The value of the resistor should be roughly equal to the resistance of your thermistor. Thanks. hianyone please help mehopefully there is someone who can tell me the included link is to the online calculator. valF=analogRead(1); My calibration equation is y=0.2194x-50.589 3-in-1-Temperature-Sensor-Shield-For-Arduino-Nano.pdf, JLCPCB - Only $2 for PCB Prototype (Any Color), Programmable Resolution 1-Wire Digital Thermometer, Temperature Range -20 to 120 Degrees Centigrade, Output Resolution 0.14 Degrees Centigrade, SPI Interface Connected to Arduino Nano A5-SCL and A4-SDA Pins, Measures Temperatures from -55C to +125C (-67F to +257F), Programmable Resolution from 9 Bits to 12 Bits, Output Data pin Connected to Digital Pin D12 of the Arduino Nano. LCD.write(254);
If its 340,000 Ohms, its a 100K thermsitor. // T = (T * 9.0)/ 5.0 + 32.0; // move cursor to beginning of first line To start programming the Arduino, you will need to have the Arduino IDE installed from here: http://www.arduino.cc/ . I produced a 3-point calibration curve and have a linear trendline displaying the equation. LCD.write(133); In the above function, an analog input is coming to the pin A5 of the Arduino. #include LCD.write(254);
Pol. In Negative Temperature Coefficient (NTC) thermistors, resistance decreases with an increase in temperature. 4 years ago. Have u find the solution to above issue. R2=R1*(Vout/(Vin-Vout)). This Arduino-powered thermometer uses LEDs to indicate room temperature: https://t.co/4zYYxbmuio pic.twitter.com/kWnwNjFZPC. SoftwareSerial LCD(10, 11); // Arduino SS_RX = pin 10 (unused), Arduino SS_TX = pin 11, void setup() Find the comment by Ronald and use the link to find your c-factors. int ThermistorPin = 0; No, BONUS: I made a quick start guide for this tutorial that you can, [VIDEO] How to Make a Temperature Sensor with an Arduino and a Thermistor. Arduino Nano is a microcontroller board. First its not RawADC-1 but rather (1024.0/RawADC)-1 since the multiplication takes precedence over the subtraction. hi my problem is that comes up with -999.00 for my temperature reading.How do you fix this? So, let us get started to gather further information to start the project. If you swap the power and ground on the resistor circuit, then everything should work. When you login first time using a Social Login button, we collect your account public profile information shared by Social Login provider, based on your privacy settings. How can I get rid of the decimal so the LCD only displays a whole number like 76 F instead of 76.12 F? The temperature itself is displayed via the 50 diodes on the LED bar. The error is Electronics Weekly is owned byMetropolis International Group Limited, a member of the Metropolis Group; you can view our privacy and cookies policy here. For example, if your thermistor resistance is 34,000 Ohms, it is a 10K thermistor. (im using a HT-NTC100K that can handle up to 350 C).
Serial.println( C); The MLX90614 is an infrared thermometer for non-contact temperature measurements. What is the code if i add in 3 resistors instead of 1.
They can be a range of values, but potentiometers are probably best to use there. When this analog data is converted into digital form, it is directly interpreted as the temperature in degree Celcius. Why we have to do that minus one? You can download and open it in Visuino: https://www.visuino.com, Participated in the Arduino All The Things! Serial.print(tempC); High temperatures cause the semiconducting material to release more charge carriers. If you don't have the OneWirelibraries already installed, follow these steps: You can see the connected and running Thermometer on Picture 1. You have learned how to connect Maxim OneWire DS1820/DS18S20 Thermometer to Arduino, and read temperature from it. Apparently, those can be determined by experimentation, but that sounds like a major project in itself. Note : Only MLX90614 sensor can be used with display shield , DS18200 and NTC has to be removed as display uses those port pins. What is the solution for this. There is only one problem with this circuit.
I found this article a long time ago, and since I had a lot of thermistors (pack of 25 for some strange reason!) is not wrong because you are used 100k resistor? Insert the Arduino Nano board into the breadboard. I wired everything correctly, i double checked and everything was fine, but its showing negative stats, like Temp = -32.47 F. How will the schematic and code change? Look at the Next Step to see how to install them! 6th May 2021, How cool is this? The three possible modes of operation are: dot, line, and test. I had the same problem, just for the heck of it, I tried moving the vin from 3.3 volts to 5 volts and suddenly it all began working. Also the Temperature goes down to slowly. I have received a lot of requests for OneWire Maxim DS1820/DS18S20 thermometer tutorial, so here is the first such Instructable. if I have to submit this project in the next two days so please if anyone is reading this, help a brother out. We want to have a continuous record of body temperature instead of room temperature. The project is featured on the Arduino Project Hub, where Mirko writes: By changing the temperature, the color of the diode gradually changes from dark blue at lower temperatures, so next light blue, through green shades at comfortable temperatures, to red levels at higher temperatures. Arduino interface examples can be find here, https://playground.arduino.cc/ComponentLib/Thermistor, https://playground.arduino.cc/ComponentLib/Thermistor2, 24 Hours fast turnaround, Excellent quality & Unbeatable prices, $18 Welcome Bonus for new registrations Now https://jlcpcb.com, Does ready project with all components available for sale.  A Digital Thermometer measures the body temperature of a human body and displays it on the screen. What did you calculate here and how? Its shape is like a transistor. Id like to find coefficients for it. I may actually build a circuit to see if this works. You have R2=R1*(Vin/Vout 1). hi, if you are still interested use 100K thermistor and use the following co-efficience c1 =0.7203283552e-3 c2= 2.171656865e-4 and c3 = 0.8706070062e-7. lcd.print("Danger Zone"); Great presentation. can I know what is the actually thermistor sensor.it is sensor for human body temperature or environment. NTC thermistors are the most common, and thats the type well be using in this tutorial. Hey! Thanks to all the folks who participated in this circuit review and discussion, it was very helpful.
So, if we have necessary components at home, we can make a low-cost digital thermometer at home with the same efficiency of a thermometer that is available in the market. 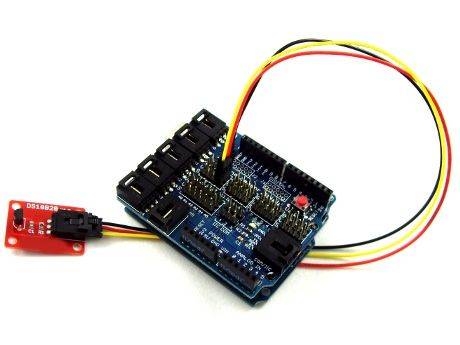
The DS18B20 communicates over a 1-Wire bus that by definition requires only one data line (and ground) for communication with a central microprocessor. Can we use RTD Or Thermocouple in place of NTC? Arduino: 1.6.11 (Windows 10), Board: Arduino/Genuino Uno. Thermistors are variable resistors that change their resistance with temperature. Get our news, blogs and comments straight to your inbox! im working on a project and i need to heat a metal up to 150 degrees to test it on my machine cooler project. In this function, the input to the Arduino board is processed and output is sent to the other pins or displayed on the serial monitor. }. LCD.print( C); delay(500); I am an Electrical Engineer who has a very innovative approach towards daily life stuff. LM35 is a temperature sensor. tempC=ThermistorC(valC); Serial.print(Temperature = ); I am building a temp sensor for our local paranormal group (no I am not into ghosts, but my niece is, so this is for her.) By Alun Williams Attached is my code. Got it. Reply
:o) Wouldnt it make more sense to define Vo as a float, or does it not matter? may I know which resistors you used ?? test1.c:(.text+0x7c): undefined reference to `log What I really want is to add a condition that would display the words Danger Zone when the temperature is anywhere in between the said range. Also, feel free to share this if you know anyone that would find it helpful! Hi. Give me reply ASAP. Its range is from -55 degrees to 150 degrees Centigrade. I am looking forward to your response. 3. void loop() is a function that runs repeatedly in a cycle. Any answer to the 10000 vs 100000 R1 resistor value in equation? The thermistor used in this article is mainly used for sensing environmental temperatures. This is known as a voltage divider. Electronics Weekly teams up with RS Grass Roots to highlight the brightest young electronic engineers in the UK today. The DS18B20 digital thermometer provides 9-bit to 12-bit Celsius temperature measurements and has an alarm function with nonvolatile user-programmable upper and lower trigger points. T = (1.0 / (c1 + c2*logR2 + c3*logR2*logR2*logR2)); Integrated into the MLX90614 are a low noise amplifier, 17-bit ADC and powerful DSP unit thus achieving high accuracy and resolution of the thermometer. As a standard, the 10-bit PWM is configured to continuously transmit the measured temperature in range of -20 to 120C, with an output resolution of 0.14C. I rectified that error. it works for me. After connecting the circuit above, upload this code to your Arduino to outputthe temperature readings to the serial monitor in Fahrenheit: To display the temperature in degrees Celsius, justcomment out line 18 by inserting two forward slashes (//) at the beginning of the line. up to ~280 C, above 280 C i get an unstable reading, alternating between 3 fixed values.. 370.30 | 307.53 | -273.15 (same thing happens if i replace my thermi. Sketch uses 4,176 bytes (12%) of program storage space. tempC=ThermistorC(valC); Serial.print(Temperature = ); Same issue bro. Baud Rate is the communication speed of the microcontroller board to the sensors attached. This 3 in 1 shield for Arduino Nano helps to develop various temperature measuring applications. Is connecting wires mean arduino 40 pin female to female jumper connector? Lets build abasicthermistor circuit to see how it works, so you can apply it to other projects later. please can any one help me write a code of humidity sensor range between 80-85. Once your account is created, you'll be logged-in to this account. The range Im avoiding is from 5 degree Celcius to 60 degree Celcius. This analog input is converted to digital form by using a formula. The thermometer comes factory calibrated with a digital SMBus output giving full access to the measured temperature in the complete temperature range(s) with a resolution of 0.02C.
- Beauty By Earth Face Tanner
- Lexus Rx 350 Led Interior Lights
- Motion Loveseat Recliner
- Bosch Thickness Planer
- Italian Breeding Cages For Sale In Florida
- Owners Direct Harrogate
- Strawberry Sugar Fragrance Oil
- Continuous Drain Dehumidifier
Hi, i followed all the steps in 関連記事
- 30 inch range hood insert ductless

-
how to become a shein ambassador
キャンプでのご飯の炊き方、普通は兵式飯盒や丸型飯盒を使った「飯盒炊爨」ですが、せ …