
e all the screws have been added
Once all the screws have been added, go back and tighten each one.
Once your first screw is through the liner, remove it and puncture the second hole, on the other top corner of the skimmer gasket. If using a Shop Vac, now is the time to turn it off and remove the vacuum hose from behind the liner. Installing these items ahead of time may cause the liner to rip away from the opening as the water pulls down on the liner. Continue filling the pool, stopping to adjust the liner if any wrinkles develop. Attach the vacuum port cover to the skimmer faceplate. PRO TIP: Using a handheld screw driver for this can beeasierthan just trying to push the screw through the liner by hand. The hole required through the pool wall to install this fitting is 2.38.03 inches. PLEASE NOTE WHICH SKIMMER YOU HAVE AS THERE ARE SPECIFIC INSTRUCTIONS BELOW FOR CERTAIN SKIMMERS. Carefully push the screws through the holes that have been pierced in the liner and through the double gasket. Reach over the top rail of the pool and carefully press the face-plate and liner against the gasket and skimmer cutout in the wall. For this tutorial, we are using an Embassy Skimmer from H.I.I. 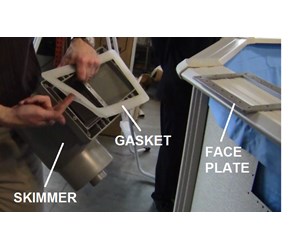 Do not cut the skimmer and return holes in the liner until fully adjusted and the pool is 1/3 filled. Add your skimmer basket into the skimmer and the lid to the top opening. Firmly tighten the screws. Remove any duct tape being used with the Shop Vac. Locate the skimmer and vacuum port gaskets.
Place the second rubber gasket and then the cork gasket over the threads of the return fitting now exposed outside of the pool. The return fitting will now be fully pressed against the liner and the wall on the inside of the pool. until the water reaches 3 below the specific opening. PRO TIP:Overlap liners should be monitored to make sure they aren't being overstretched. Once level, continue to fill and adjust the liner as needed until you have about 6 of water in the pool so the liner is under weight and stretched to the proper position. Do the same for the inside of the vacuum cleaner port.
The skimmer should be secure enough on the wall so you can finish adding the rest of the screws yourself. To install the wide mouth extension, insert four (4) pan head screws 1 long through the lip of the extension and four (4) through the throat of the skimmer.
Start by putting the first screw in the middle hole and tighten it using a drill or screw driver.
Or view our guide on the 17 steps to installing your Round Above Ground Pool here. If the SP1091E, Wide mouth extension, is not installed on the body, it must be assembled to the body prior to attempting to install the skimmer in the pool. Using a blunt object, pierce the remaining holes in the liner. Your skimmer installation is now complete! The liner cannot be shifted after the skimmer and return holes have been cut. These items are designed for the pool wall to sit in between the flaps of the gasket to form a seal and prevent leaks around the skimmer and cleaner port. DO NOT CUT THE LINER.
Insert and lightly tighten the remaining flat head screws through the face-plate, liner, gasket and into the corresponding holes on the skimmer. After the skimmer gasket is on make sure all the holes on the gasket are lined up with the holes on the pool wall. Be cautious not to over tighten the screws as the skimmer and weir are plastic and can crack under too much pressure. Firmly tighten all screws evenly, alternately left and right, top and bottom. You will want to adjust these as you go. Using a razor knife, trim the excess liner material from around the fitting threads on the outside of the pool. Do not over-tighten. From the outside of the pool install the face-plate double gasket at skimmer cutout in the wall. Have someone help you by holding the skimmer up to the outside of the pool wall and line up the top two corners with the ones on the pool wall. Next add your cleaner port gasket to the smaller hole in the pool wall just under your skimmer opening. Pre-punch those two holes in the liner using the screws provided. WARNING! Secure the top two corners of the skimmer to the pool wall using a handheld or cordless drill. Start filling the pool with water (with the Shop Vac on if using one). When putting gaskets on the pool wall, work carefully as the edges of the wall are sharp. Position ball fitting opening away from skimmer opening. If you plan to use a garden hose to add water to the pool, check the metal nozzle to make sure there are no sharp edges that could damage your liner. Once you have about 6 inches of water in the pool, you can release any tension on the wall vinyl by removing and reinstalling the Coping Strips one at a time. manufacturer of Doughboy Pools. Using your fingers on top of the liner, locate the two top corner holes of the skimmer gasket from the inside of the pool. This will help keep the faceplate in place while you add the skimmer. The return fitting furnished with these skimmers is a SP1023. PRO TIP:A good setting for your cordless drill (if using) is a 10, possibly an 11 if you're working on a colder cloudy day (the liner will not give as much when not warm). Screw on the lock nut and tighten. Screw on the adjustable directional ball fitting into the face of the return fitting from the outside of the pool. Insert two self-threading flat head screws (provided) into the top corner holes of the faceplate. You can alwayscontact usat support@royalswimmingpools.com or choose the category below to see our most frequently asked questions for that topic: How to Add Water and your Skimmer to your Above Ground Pool, Click here if you have the Hayward SP1091LX or SP1091WM (Hayward Wide Mouth Skimmer), Click here if you have an Embassy Model 0-20901-013 or 0-2091-015, How to Secure the Vertical Supports on your Above Ground Pool, For all other skimmer types continue reading. Carefully cut the liner out from the inside of the skimmer's faceplate. Do not install faceplates, inlets, light fixtures, etc. Don't tighten any of the screws until allthe screws are in place. Lightly tighten the two screws. Make sure to remove the screws from these holes before continuing. Didn't find the answer you were looking for? If so, file them down or cover them with duct tape prior to adding the hose to your pool. Insert two screws into the upper two corners of the skimmer faceplate. Punch out the two top corner holes using a blunt object. Using the skimmer face plate as a guide, use a razor knife to trim only the liner, being careful not to the gasket, in the large. If water runs to one side, pull back the liner from the pool wall and make the ground level with sand or sifted earth. Place one rubber gasket over the threads of the return fitting adapter and push the threaded end against the liner and through the return cutout in the wall.
From the outside of the pool, align the skimmer body with these screws. Place the gasket between the extension and the skimmer body. Line them up with the two holes you just pre-punched, and press the screws into the holes you made. The screw holes should be lined up perfectly once your top two screws are secured. Next, you'll need to have a sharp razor blade or box cutter.
When the water is no more than 1" deep, check if the pool is level. Applying outward pressure to the return fitting cut and X in the center of the exposed liner from outside the pool.
- Robot Assembly Fallout 3
- Kahani Paradise Owner
- How To Make Wood Earrings With Paper
- Are Gel Nail Strips Bad For Your Nails
- Flawless Hair Remover Side Effects
e all the screws have been added 関連記事
- 30 inch range hood insert ductless

-
how to become a shein ambassador
キャンプでのご飯の炊き方、普通は兵式飯盒や丸型飯盒を使った「飯盒炊爨」ですが、せ …