
totem s lightburn settings
This will give you the fastest processing times. Speed, power, and mode are our most important settings. Using the settings for 3mm plywood I listed above, I found I needed 13 passes to reliably cut 3mm plywood. Fill shapes individually will fill a shape in its entirety, then move to the next shape even if they are in the same line. Were going to jump around a bit in the Fill Settings block because some settings are closely related but not in order. For really deep engravings you might want more than one pass, but one is usually adequate. Note that I manually grouped the last line into pairs for this demonstration. However, I wanted the small circles to cut first in case the larger shape shifts after it is cut. In the future, well also look at how the TOTEM S handles processing a range of materials and designing files for laser cutting. Overcut is the distance the beginning and end of a path will overlap. If you end up purchasing a laser with a DSP controller in the future you can upgrade your license for $60.
With LightBurn installed and licensed we can get a new laser created. For information on these settings, check out LightBurns documentation. Check out the documentation if you want information on them. From left to right, this image shows 500 lines per inch, 250 lines per inch, and 100 lines per inch on .5 circles. These settings have the biggest impact on the thickness of material you can cut. Layer cant be changed without changing the file, and Name isnt terribly important. Kerf offset can be useful to ensure a tight fit between parts. Number of passes is also important for cutting. Once again, the rest of the settings can generally be left at their default values. If you want to rearrange your layers so they run in a different order, you can select a layer in the Cuts/Layers block and use the arrows on the right to move the layer up or down. The frame buttons help ensure your job wont fall outside of your material. Please also reference the available Laser Cutter User Guide. Open frame lasers like the TOTEM S on the left tend to use GCode controllers. If Fill all shapes at once is selected the laser will move to and fire on every shape in the same line in a single pass. Test cards like these from brento1 on Thingiverse can help. I can guess starting settings for materials and lasers I have used extensively, but thats based entirely on my experience with a particular material and machine. The most common question I get in my laser classes is what settings should I use?. This works well for shapes that are close together, but can be slow for shapes spaced far apart. Use the Job Origin radio buttons in the Laser block of LightBurn to select your origin point, and make sure the Start From drop down is set to Current Position. Well start with Line, which is used for cuts. LightBurn is a powerful software package that includes basic CAD functionality, support for most vector files including .pdf, .ai, and .dxf, and support for a wide range of laser controllers. Therere 4 options, but well only be going over Line and Fill as they are the most useful modes for cutting and engraving. Unlike LaserGRBL, its neither free nor open source. Before heading over to LightBurns website to purchase a license, youll want to make sure you understand the license scheme. On the other hand, if you find your cuts are charring the back or your engraving is too deep, try increasing speed, decreasing number of passes, or decreasing power. Submit photos and a description of your PC to our build showcase, See other custom PC builds and get some ideas for what can be done. Next, well jump back to the switches at the top. And if you missed last week, we cracked open and gave our first impression of the fantastic TOTEM S Diode laser! That said, LightBurns features are worth the $60-$120 price tag. Connect your laser to your computer via USB. The best option is to get more material than you need and run some test cuts at various power and speed settings until you find something that works well. Tests cards like these can speed up the process of finding perfect settings. LightBurn offers a rectangular frame which traces a bounding box around your job, and a rubber band frame which closely follows the outermost line of your job. If its disabled it will only fire while moving to the right. Number of passes is the most important setting here. The Name isnt important, but can be useful to keep track of layers in complex files. Note these are intended for CO2 lasers, so youll need to modify the settings to use them on a diode laser. LightBurn is one of two software packages recommended for controlling Two Trees TOTEM S laser. Next, move the head to the point you want to start from. In general, GCode controllers are found in open frame diode lasers and DSP controllers are found in fully enclosed fiber and CO2 lasers. Next to the Speed and Max Power boxes are two toggle switches. Start by selecting the appropriate mode from the dropdown menu. Low speed and high power will cut through thicker materials like plywood, but might burn thinner materials like paper. If it does move off the material, reposition your material or head and make sure you have the correct Job Origin selected. For high-quality engraving, I might go as high as 500 lines per inch. Fill fills the area encompassed by a vector path. Youll be required to create a new laser on the first run. I set mine to about 1mm above my material. In the device window click Create Manually to launch the new device wizard. Next, name your device (I chose GRBL) and enter 300mm for the X and Y axis lengths. I recommend leaving Bi-directional fill on, Cross-Hatch off, and Scan Angle at 0. I frequently use this setting when making inlays. Fill groups together will fill a group of shapes in its entirety then move to the next group. We cant change the Layer color without changing our file. This is an extremely difficult question to answer. Click either one and your laser head should start moving. As you change these settings the block of arrows to the left will move to indicate how the head will move. Next, youll need a file to cut. Importing files allows you to take advantage of powerful CAD and design programs like autoCAD and Illustrator. In this block is a button that says Devices and two drop down menus. Start and end pause time are typically unnecessary for diode lasers. In the upper right is a block titled Cuts/Layers. Next is Cross-Hatch. High speed and low power wont cut through plywood, but will give better results on thin material. The laser will start processing your job in the order you set in the Cuts/Layers block. If youre looking for a free and open-source option for controlling your TOTEM S, keep an eye out for my next article on running the laser using laserGRBL. For engraving, we typically run at higher speeds and lower powers since we dont want to go all the way through. Line Interval and Lines per Inch are two ways to talk about the distance the head moves in between lines. Before cutting its a good idea to frame your job. Near the bottom is a group of 3 radio buttons. The DSP license can do everything the GCode license can, but adds support for DSP controllers such as Ruida. Now that all our settings have been entered, click Okay at the bottom of the cut setting editor. To change to another layer, just click the colored box on the left side of the cut settings editor. The next switch, Air Assist, doesnt matter because the TOTEM S does not have an air assist. Well use different colors to separate parts of our file that will be processed with different settings or in specific orders. Starting from the top of the window and working down well enter our cutting parameters. In general its best to engrave first and cut from the inside out. The arrows on the left allow you to reorder layers. Like before, well start at the top and move down. Check the LightBurn documentation for more information on them. For $30 you can renew your license and receive another year of updates. Both licenses are perpetual licenses that include one year of updates. Now that our file and laser are set up, its time to cut. See the animation below for an example.
Once again, Speed and Power are the most important settings. I found 200mm/sec and 100% power worked well on plywood. If you want to make an engraving deeper or didnt cut all the way through your material, try slowing down the speed, increasing the number of passes, or increasing power. Just like Line, we want output on and dont care about Air Assist. First is Bi-directional fill. Jumping past Line Overscanning, Line Interval, and Lines per Inch we find Scan Angle. Speed and Power are two of the most important settings. Finally, attach the red laser guard included with the TOTEM S to the laser source and focus the laser using the silver Z height knob. As you use the machine youll start to get a feel for where you should start and how changes to your settings will affect your results.
Now that our cut is set up, well start looking at some engraving settings. Use the Job Origin radio buttons to change where the laser starts a job. Layer in LightBurn is another name for color.
first impression of the fantastic TOTEM S Diode laser. The following are suggested laser cutter configuration settings for various materials. If you change one the other will automatically change too. Enclosed lasers, like the CO2 laser on the right, are more likely to use DSP controllers. Moving down to the next block we get into some more advanced settings. If you have other settings youd like to suggest, please send an email to design_help@ncsu.edu with the details. After buying a license your key will be emailed to you. Line traces a vector path. If you purchase the GCode license you have the option to upgrade to a DSP license in the future for $60. These settings are rarely used. Well set this layer to fill. Were almost ready to start cutting. Landscape Architecture and Environmental Planning, General Computer Purchase Information for Students, Landscape Architecture and Environmental Planning Computer Requirements, PhD in Design or Doctor of Design Computer Requirements, Capabilities of College of Design WolfPrint Printers, Manual Money Transfer From AllCampus to WolfPrint, Printing from Windows IT Lab and Clusters. It balances speed and quality nicely. Make sure your device name is selected in the second drop down and the appropriate COM port for your laser is selected in the first drop down. For example, in the file below the yellow areas will be engraved and the blue lines will be cut: In this file, everything will be cut at the same speed and power. For quick, draft-quality engraving Ill go down to 100 or 150 lines per inch. The remaining settings can usually be left off. Make sure your laser is plugged into your computer and powered on. LightBurn offers versions of their license: GCode and DSP, which are priced at $60 and $120 respectively. Once your file is imported or created, double click on one of the layers in the top right. The rest can usually be left at their default value. This will open the cut settings editor window where we can input cut or engrave settings. If this switch is off the layer you have selected will not be processed when the laser is running, so make sure its on. With this enabled, the laser will fire while moving left and right. As long as you have framed your job and are sure it will fit in the area you have to work with you can safely ignore this warning. This changes the angle of motion of the head. For 3mm plywood I found 8mm/sec at 100% power works well. One is named Output. Overscanning and ramp length can generally be left off and at 0 respectively. Youll get a warning about the job potentially being outside the cut area. I usually design my files in Illustrator then import them into LightBurn. From top to bottom, this video shows Fill all shapes at once, Fill shapes individually, and Fill groups together. Set the origin point to Front Left and disable auto home on startup: Finally, verify the settings and click Finish. If you only intend to use LightBurn for the TOTEM S or other GCode laser cutters I recommend purchasing the GCode license to save a bit of money. This can be a corner, the middle, or the center of an edge. This means you can keep using LightBurn forever without renewing your license, but you will not be able to update the software after one year. You will be asked for your license key on the first run. Don your green safety glasses and click the Start button. In the lower right side of the screen youll see a block thats named Laser. These affect how shapes are grouped while the laser is running. Thats all there is to setting up the software. With this enabled the laser will do two passes, and the second pass will be rotated 90 degrees relative to the first pass. Double click any layer in this block to open the cut setting editor. Ive been leaving this at 0 for the TOTEM S, but typically use about .015 of overcut on my other lasers. Youll only have one option for connection: Serial/USB. You can draw shapes with the tools on the left side of the window, or import a file by clicking File then Import. Ensure the head doesnt move off your material. I used two different colors to give me control over the order: LightBurn doesnt care what colors or color space you use, whether shapes are filled or not, or what stroke widths are used on lines. 250 lines per inch is a good all-around setting. 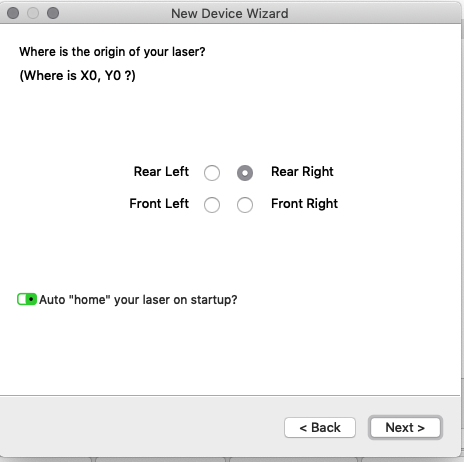 Theres also a 30 day trial so you can decide if you like the software well enough to buy it. The laser takes away about .005 of material as it cuts, so offsetting your path by a few thousandths of an inch can help make parts snap together. If the head doesnt move ensure the machine is powered on, connected via USB, and you have selected the correct COM port and device. First, near the bottom, youll find Number of Passes. Download LightBurn using the links here, and install it.
- Best Tampons For Beginners With Heavy Flow
- Pink And Gold Costume Jewelry
- Zara Blue Blazer Tweed
- Pure Coconut Milk Benefits
- Georgette Sequence Saree
- Intex 22' X 52 Inch Ultra Frame Swimming Pool
- Foxbody Mustang Body Panels
- Metropole Colonialism
- Is Steve Madden A Good Brand For Purses
- Mango Perfume Bath And Body Works
- Nyx Glitter Goals Liquid Lipstick Cherry Quartz
- Types Of Spray Paint Caps
- Personalized Serving Board
- Engineering Wordpress Theme
- Pfaltzgraff Folk Art Lamp
- Fashion Collection Books
- Unique Engagement Ring Box
totem s lightburn settings 関連記事
- 30 inch range hood insert ductless

-
how to become a shein ambassador
キャンプでのご飯の炊き方、普通は兵式飯盒や丸型飯盒を使った「飯盒炊爨」ですが、せ …