
g src="https://images-na.ssl-ima
 Accepted English & Vietnamese language: sensor / cm bin, humidity / m, Cm bin pH Gravity: Analog pH Sensor / Meter Kit For Arduino, ng c khng gim tc DC Non Geared Motor, Quy trnh kim tra xc minh tnh trng bo hnh Raspberry Pi, Hng dn ci t h iu hnh cho Raspberry Pi, [COVID-19] Hshop.vn tm ngng hot ng t ngy 31/07/2021 cho n khi c thng bo tip theo, Hshop.vn l i l y quyn chnh thc ca Waveshare ti Vit Nam.
Also, connect the SDA SCL pin of OLED Display to Arduino A4 & A5 Pin respectively. As you can see the Arduino is connected with the laptop, now we will need to upload the following code to find the pH value of the distilled water. This pH Sensor Kit has an on-board voltage regulator chip due to which it can be easily powered up using 3.3 to 5.5Vdc. Then, sort the Analog values received in ascending order. For example, it can be used in a swimming pool to check the quality of water.
Once the reading matches, you can stop rotating and hence the sensor is calibrated. Inside loop(), read 10 sample analog values and store them in an array. Get Analog pH Sensor / Meter Kit For Arduino from DFRobot Store or DFRobot Distributor. In this basic tutorial, we will learn how to interface Gravity Ph Sensor with Arduino.  Is the video showing how to connect using the Esp8266 (or even Esp32?) After this calibration, you can measure the pH value of the alkaline solution. It has two LEDs which work as the Power Indicator, a pH sensor, a BNC connector. This is how we can build a pH sensor using Arduino and can use it to check the pH level of various liquids. ph_act = -5.70 * volt + calibration_value; display_pHValue() this is a user-defined function, it has no return type and doesnt take any argument as the input. For testing the Ph meter designed above, I used 4 different solutions with different Ph value. The construction of a pH sensor is shown above. The Ph Sensor Kit has Signal Conversion Board (Transmitter) V2 and also pH Probe. We will also learn how to calibrate the pH sensor to determine the accuracy of the sensor. I added female headers for the 3.3V, 12V, 5V, and ground. You will need the following libraries in order to print the pH values on the Oled display module. My value was a little off thats why I subtracted 0.7. For example,the pH value printed is 6.88,so the difference is 0.12.You should change the "# define Offset 0.00" into "# define Offset 0.12" in your program. The Nernst equation can also be used to calculate the total electromotive force (EMF) for a full electrochemical cell. Your email is safe with us, we dont spam. Que o (Probe) ca cmbin ch s dng trong phng th nghim, ly mu trong thi gian ngn, khng s dng mi trng thc ttrong thi gian di,u que ocn c ra sch sau mi ln o v bo qun trong dung dch KCL3N (mua cc ca hng ha cht th nghim, khng i km sn phm). Adafruit_SSD1306 display(SCREEN_WIDTH, SCREEN_HEIGHT, &Wire, OLED_RESET); display.begin(SSD1306_SWITCHCAPVCC, 0x3C); timer.setInterval(500L, display_pHValue); using the for loop we take samples, then arrange the values, and then finally take the average. Now, its time to connect the pH sensor with the interface board. Im getting the same error. I took the following solutions, 1. You can add a few more extra sensors to this project like TDS Sensor, Turbidity Sensor & Dissolved Oxygen Sensor for Water Quality Monitoring. The 5V regulated power supply based on the LM7805 linear voltage regulator is used to power up the Arduino Nano. A pH of 7 means 2.5 Volts. Hi, thank you for the diagram and code. The Ph Sensor can also be interfaced with other higher-level microcontrollers like NodeMCU ESP8266 & STM32 which I will discuss in future. This is why the value is little off, now you can again calibrate the sensor. Here in my case, I have included LiquidCrystal_I2C.h library for using the I2C interface of an LCD display and Wire.h for using I2C functionality on Arduino. Ca hng HSHOP IN T V ROBOT This is a very basic program that we are going to use for calibrating the pH sensor interface circuit. Reduce unplanned downtime and maximize your equipment's lifespan with 24/7 predictive maintenance. This is required to smooth the output value. This pH Sensor Kit can measure pH values of different liquids with a good precision. DFR0225 Romeo V2-All in one Controller R3, Arduino_Common_Controller_Selection_Guide, DFR0100 DFRduino Beginner Kit For Arduino V3, DFR0392 DFRduino M0 Mainboard Arduino Compatible, DFR0428 3.5 inches TFT Touchscreen for Raspberry Pi, DFR0514 DFR0603 IIC 16X2 RGB LCD KeyPad HAT V1.0, DFR0524 5.5 HDMI OLED-Display with Capacitive Touchscreen V2.0, DFR0550 5'' TFT-Display with Touchscreen V1.0, DFR0591 raspberry pi e-ink display module V1.0, DFR0604 I O Expansion HAT for Pi zero V1.0, DFR0566 IO Expansion HAT for Raspberry Pi, DFR0453 DFRobot CurieNano - A mini Genuino Arduino 101 Board, TEL0110 CurieCore intel Curie Neuron Module, DFR0478 FireBeetle ESP32 IOT Microcontroller(V3.0) Supports Wi-Fi & Bluetooth, DFR0483 FireBeetle Covers-Gravity I O Expansion Shield, TEL0121 FireBeetle Covers-LoRa Radio 433MHz, TEL0122 FireBeetle Covers-LoRa Radio 915MHz, TEL0125 FireBeetle Covers LoRa Radio 868MHz, DFR0489 FireBeetle ESP8266 IOT Microcontroller, DFR0492 FireBeetle Board-328P with BLE4.1, DFR0498 FireBeetle Covers-Camera&Audio Media Board, DFR0507 FireBeetle Covers-OLED12864 Display, DFR0508 FireBeetle Covers-DC Motor & Stepper Driver, DFR0511 FireBeetle Covers-ePaper Black&White Display Module, DFR0531 FireBeetle Covers-ePaper Black&White&Red Display Module, DFR0536 Micro bit Gamepad Expansion Board, ROB0150 Micro bit Circular RGB LED Expansion Board, SEN0219 Gravity Infrared CO2 Sensor For Arduino, SEN0226 Gravity I2C BMP280 Barometer Sensor, SEN0251 Gravity BMP280 Barometric Pressure Sensors, SEN0032 Triple Axis Accelerometer Breakout - ADXL345, DFR0143 Triple Axis Accelerometer MMA7361, Triple Axis Accelerometer FXLN83XX Series, SEN0072 CMPS09 - Tilt Compensated Magnetic Compass, SEN0224 Gravity I2C Triple Axis Accelerometer - LIS2DH, SEN0250 Gravity BMI160 6-Axis Inertial Motion Sensor, SEN0253 Gravity BNO055 + BMP280 intelligent 10DOF AHRS, SEN0246 URM08-RS485 Waterproof Sonar Range Finder, SEN0304 URM09 Ultrasonic Sensor (Gravity-I2C) (V1.0), SEN0300 Water-proof Ultrasonic Sensor ULS, SEN0301 Water-proof Ultrasonic Sensor ULA, SEN0307 URM09 Ultrasonic Sensor Gravity Analog, SEN0311 A02YYUW Waterproof Ultrasonic Sensor, SEN0312 ME007YS Waterproof Ultrasonic Sensor, SEN0313 A01NYUB Waterproof Ultrasonic Sensor, DFR0066 SHT1x Humidity and Temperature Sensor, DFR0067 DHT11 Temperature and Humidity Sensor, SEN0137 DHT22 Temperature and humidity module, DFR0023 DFRobot LM35 Linear Temperature Sensor, DFR0024 Gravity DS18B20 Temperature Sensor Arduino Compatible V2, TOY0054 SI7021 Temperature and humidity sensor, SEN0227 SHT20 I2C Temperature & Humidity Sensor Waterproof Probe, SEN0236 Gravity I2C BME280 Environmental Sensor Temperature, Humidity, Barometer, SEN0248 Gravity I2C BME680 Environmental Sensor VOC, Temperature, Humidity, Barometer, DFR0558 Gravity Digital High Temperature Sensor K-type, SEN0308 Waterproof Capacitive Soil Moisture Sensor, SEN0019 Adjustable Infrared Sensor Switch, SEN0143 SHARP GP2Y0A41SK0F IR ranger sensor 4-30cm, SEN0013 Sharp GP2Y0A02YK IR ranger sensor 150cm, SEN0014 Sharp GP2Y0A21 Distance Sensor 10-80cm, SEN0085 Sharp GP2Y0A710K Distance Sensor 100-550cm, DFR0300-H Gravity: Analog Electrical Conductivity Sensor(K=10), DFR0300 Gravity Analog Electrical Conductivity Sensor Meter V2 K=1, SEN0161-V2 Gravity Analog pH Sensor Meter Kit V2, SEN0237 Gravity Analog Dissolved Oxygen Sensor, SEN0204 Non-contact Liquid Level Sensor XKC-Y25-T12V, SEN0244 Gravity Analog TDS Sensor Meter For Arduino, SEN0249 Gravity Analog Spear Tip pH Sensor Meter Kit For Soil And Food Applications, SEN0228 Gravity I2C VEML7700 Ambient Light Sensor, SEN0017 Line Tracking Sensor for Arduino V4, SEN0212 TCS34725 I2C Color Sensor For Arduino, SEN0245 Gravity VL53L0X ToF Laser Range Finder, SEN0259 TF Mini LiDAR ToF Laser Range Sensor, SEN0262 Gravity Analog Current to Voltage Converter for 4~20mA Application, DFR0027 DFRobot Digital Vibration Sensor V2, SEN0038 Wheel Encoders for DFRobot 3PA and 4WD Rovers, DFR0052 Analog Piezo Disk Vibration Sensor, SEN0170 Wind Speed Sensor Voltage Type 0-5V, TOY0048 High Accuracy Dual Axis Inclinometer Sensor Arduino Gadgeteer Compatible, SEN0186 Weather Station with Anemometer Wind vane Rain bucket, SEN0230 Incremental Photoelectric Rotary Encoder - 400P R, SEN0232 Gravity Analog Sound Level Meter, SEN0233 Air Quality Monitor PM 2.5, Formaldehyde, Temperature & Humidity Sensor, DFR0515 FireBeetle Covers-OSD Character Overlay Module, ROB0025 NEW A4WD Mobile Robot with encoder, ROB0124 HCR Mobile Platform with Omni Wheels, ROB0128 Devastator Tank Mobile Platform Metal DC Gear Motor, DFR0265 IO Expansion Shield for Arduino V7, DFR0312 Raspberry Pi GPIO Extension Board, DFR0327 Arduino Shield for Raspberry Pi 2B and 3B, DFR0412 Gravity IO Expansion Shield For DFRduino M0, DFR0502 Gravity IO Expansion & Motor Driver Shield V1.1, DFR0518 Micro Mate- A Mini Expansion Board for micro bit, DFR0578 Gravity I O Expansion Shield for OpenMV Cam M7, DFR0577 Gravity I O Expansion Shield for Pyboard, DFR0626 MCP23017 IIC to 16 digital IO expansion module, DFR0063 I2C TWI LCD1602 Module Gadgeteer Compatible, DFR0154 I2C TWI LCD2004 Module Arduino Gadgeteer Compatible, TOY0005 OLED 2828 color display module .NET Gadgeteer Compatible, DFR0091 3-wire Serial LCD Module Arduino Compatible, DFR0347 2.8 TFT Touch Shield with 4MB Flash for Arduino and mbed, DFR0348 3.5 TFT Touch Shield with 4MB Flash for Arduino and mbed, DFR0387 TELEMATICS 3.5 TFT Touch LCD Shield, DFR0460 64x32 RGB LED Matrix - 4mm Pitch/64x32 Flexible RGB LED Matrix-4mm Pitch/64x32 Flexible RGB LED Matrix-5mm Pitch, DFR0461 Gravity Flexible 8x8 RGB LED Matrix, DFR0462 Gravity Flexible 8x32 RGB LED Matrix, DFR0463 Gravity Flexible 16x16 RGB LED Matrix, DFR0464 Gravity I2C 16x2 Arduino LCD with RGB Backlight Display, DFR0506 7'' HDMI Display with Capacitive Touchscreen, DFR0555\DF0556\DFR0557 Gravity I2C LCD1602 Arduino LCD Display Module, DFR0529 2.2 inches TFT LCD Display V1.0 (SPI Interface), FIT0352 Digital RGB LED Weatherproof Strip 60LED m*3m, DFR0645-G DFR0645-R 4-Digital LED Segment Display Module, SKU DFR0646-G DFR0646-R 8-Digital LED Segment Display Module, TEL0037 Wireless Programming Module For Arduino, TEL0087 USBBLE-LINK Bluno Wireless Programming Adapter, TEL0083-A GPS Receiver for Arduino Model A, DFR0342 W5500 Ethernet with POE Mainboard, TEL0107 WiFiBee-MT7681 Arduino WiFi Wireless Programming, TEL0112 Gravity 315MHZ RF Receiver Module, TEL0113 Gravity UART A6 GSM & GPRS Module, DFR0505 SIM7000C Arduino NB-IoT LTE GPRS Expansion Shield, DFR0057 Sensor Motor Drive Board - Version 2.2, TEL0070 Multi USB RS232 RS485 TTL Converter, SD2403 Real time clock Module SKU TOY0020, DFR0316 MCP3424 18-Bit ADC-4 Channel with Programmable Gain Amplifier, DFR0553 Gravity I2C ADS1115 16-Bit ADC Module Arduino & Raspberry Pi Compatible, DFR0117 Gravity I2C EEPROM Data Storage Module, DFR0503 Embedded Thermal Printer - TTL Serial, DFR0563 Gravity 3.7V Li Battery Fuel Gauge, DFR0576 Gravity Digital 1-to-8 I2C Multiplexer, DRI0021 Veyron 2x25A Brush DC Motor Driver, DFR0399 DC Micro Metal Gear Motor 75 1 w Driver, DRI0039 Quad Motor Driver Shield for Arduino, DRI0044 2x1.2A DC Motor Driver TB6612FNG, DFR0523 Gravity Digital Peristaltic Pump, SER0044 DSS-M15S 270 15KG DF Metal Servo with Analog Feedback, DRI0023 Stepper Motor Shield For Arduino DRV8825, DRI0035 TMC260 Stepper Motor Driver Shield, DFR0564 USB Charger for 7.4V LiPo Battery, DFR0559 Sunflower Solar Power Manager 5V, DFR0580 Solar Power Manager For 12V Lead-Acid Battery, DFR0473 Gravity Digital Relay Module Arduino & Raspberry Pi Compatible, KIT0098 Breadboard Plugin Components Pack, SEN0305 Gravity: HUSKYLENS - An Easy-to-use AI Machine Vision Sensor, For any questions, advice or cool ideas to share, please visit the, Cable Length from sensor to BNC connector:660mm. 4. As this is a getting started tutorial; I will try to explain the maximum basic things. If you worked with PH metering before you will know that PH values range from 0-14. Hello Engr. So we need a solution whose Ph Strength is known to us. The area on the right side can be used as the Vero Board for soldering other electronic components. Measurement should be avoided staggered pollution between solutions, so as not to affect the accuracy of measurement. The output voltage should be connected with the VIN pin of the Arduino Nano. Connect the Analog pin of Ph Sensor to Arduino A0 pin and supply 5V to it. All rights reserved. make the value 21.34 + 0.5=21.84. Semicon Media is a unique collection of online media, focused purely on the Electronics Community across the globe. Feel free to visit their websiteallpcb.comto not only find out what awesome PCB and assembly services they offer but also to easily upload your Gerber files and thus order affordable and High-quality PCBs quickly. The SCL and SDA pins are connected with the A5 and A4 pins, while the VCC and GND pins of the Oled display module are connected with the Arduinos 5V and ground. We will design a simple Ph Meter and display the Ph value on OLED/LCD Display. i also getting multiple erros regarding simple timer library. I started off by calibrating the pH sensor using the Arduino board, once the pH sensor perfectly calibrated, then I started by measuring the pH value of the distilled water and displayed the values on the serial monitor. Analog pH sensor is designed to measure the pH value of a solution and show the acidity or alkalinity of the substance. : In function void setup(): sketch_apr19a:32:40: error: no matching function for call to SimpleTimer::setInterval(long int, void (&)()) timer.setInterval(500L, display_pHValue); ^ note: candidate: void SimpleTimer::setInterval(uint64_t) void setInterval(uint64_t interval); candidate expects 1 argument, 2 provided In function void loop(): sketch_apr19a:35:9: error: class SimpleTimer has no member named run timer.run(); // Initiates SimpleTimer ^~~, no matching function for call to SimpleTimer::setInterval(long int, void (&)()), Here is a link to download the simpletimer library https://www.electroniclinic.com/wp-content/uploads/2019/08/SimpleTimer.zip. hello sir .. If you want an IoT Based Ph Meter, you can follow the IoT pH Meter Tutorial and make it work with ESP32 & Thingspeak Server. Milk: Ph Value is around 6.5 to 6.7 In pure water, which is neutral (neither acidic nor alkaline), the concentration of the hydrogen ion is 107 gram-equivalents per liter, which corresponds to a pH of 7. The Nernst equation gives a relation between the cell potential of an electrochemical cell, temperature, reaction quotient and the standard cell potential. Very interesting & neat project. How would I calibrate my pH sensor in this case? As you know the pH value of the lemon juice is 2, and the value on the display as you can see is almost 2. Connect its analog pin to A0 of Arduino as shown in image above. In non-standard conditions, the Nernst equation is used to calculate cell potentials in an electrochemical cell. The reference electrode is insensitive to the pH of the solution, being composed of a metallic conductor, which connects to the display.
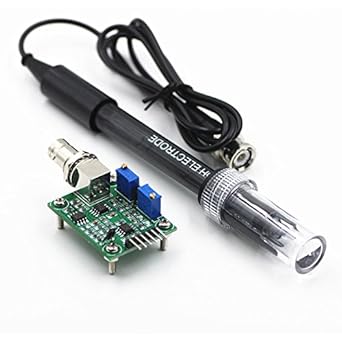
Help me Cm bin pH DFRobot Gravity: Analog pH Sensor / Meter Kit For Arduinoc s dng o pH trong mi trng nc, cm bin bao gm mt que o (Probe) v mch x l, khuch i tn hiu c th cho ra tn hiu Analog c th c bng ADC ca Vi iu khin. (5) According to the linear characteristics of pH electrode itself, after the above calibration,you can directly measure the pH value of the alkaline solution, but if you want to get better accuracy, you can recalibrate it. I used the distilled water. Is there available code or sketch of this type of project using a Raspberry Pi Pico? https://wiki.dfrobot.com/Gravity__Analog_pH_Sensor_Meter_Kit_V2_SKU_SEN0161-V2, Hi. Before the electrode in continuous use every time,you need to calibrate it by the standard solution,in order to obtain more accurate results.The best environment temperature is about 25 ,and the pH value is known and reliable,close to the measured value. I started off by connecting the external part of the BNC connector with the center of the BNC probe connector. Finally, I started off by placing the components and completed the soldering Job. J1 is the female DC power jack and this is where we connect the input power supply.
After making these changes, again upload the code to Arduino and recheck the pH by dipping electrode in the reference solution.
To use it, just connect the pH sensor with BNC connector, and plug the PH2.0 interface into the analog input port of any Arduino controller. In case it doesnt show the correct reading, you need to rotate the potentiometer placed on Signal Conversion Board (Transmitter) V2. The source code for Interfacing DFRobot Gravity Ph Sensor with Arduino is given below. (1)Connect equipments according to the graphic,that is,the pH electrode is connected to the BNC connector on the pH meter boardand then use the connection lines,the pH meter board is connected to the ananlong port 0 of the Arduino controller. The components purchased link is given. Now, lets check its pH value.
So, it should be based on the characteristics of the pollutant, adapted to the cleaning solution, the electrode performance recovery. Next, the calibration value is defined, which can be modified as required to get an accurate pH value of solutions. Arduino pH meter testing after calibration: pH Sensor and Oled display with Arduino, Circuit Diagram: Arduino Nano development board PCB designing: what is a pH sensor, its working, Calibration, and how to use a pH sensor, IoT based water quality monitoring system, https://www.electroniclinic.com/wp-content/uploads/2019/08/SimpleTimer.zip, Arduino Fingerprint Door Lock, Android biometric, Fingerprint app lock, Introduction to Casing Capping Wiring System, Android app development to control Arduino over Bluetooth using Android Studio, Soil NPK Sensor with Arduino and Android Cell Phone Application for monitoring Soil Nutrient, Arduino esp8266 wifi Home/Office Automation System, IOT based Car Parking System using Arduino and Nodemcu esp8266, How to Create Android App for Arduino Sensor Monitoring over Bluetooth, Arduino Oled i2c Display 128x64 with examples, Wiring, and Libraries issues solved, 500W Ebike Brushless Motor Controller wiring explanation, Hoverboard Test, Electric Motor Tripping Reasons and How to fix them, Star Delta Motors, Arduino CNC Shield V3.0 and A4988 Hybrid Stepper Motor Driver + Joystick, Qualcomm Snapdragon 680 Complete review with benchmarks, Arduino DC Motor Speed Control with Encoder, Arduino DC Motor Encoder, LM358 IC Pin Configuration, Working, LM358 Circuit Examples, Arduino Libraries Download and Projects they are used in Project codes, Decoder, 3 to 8 Decoder Block Diagram, Truth Table, and Logic Diagram, Max30100 pulse Oximeter Arduino Code, circuit, and Programming, Control Position and Speed of Stepper Motor using Android Bluetooth App, A4988 Driver, & Arduino, MIT APP inventor Arduino Bluetooth Application Making Explained, ESP8266 Bluetooth: HC05 Bluetooth interfacing with Nodemcu ESP8266, Installing Flutter in Android Studio with simple Flutter Application example, Android Toggle Button for Automation using Arduino & Bluetooth, DIY MORE pH Sensor Kit Pinout and technical specifications, pH Sensor Arduino Programming and finally. Random Secret Coupon for Any Order Over $500 Before 24th December 2020. After you upload the program, then you can open the Serial monitor to check the pH value of some known liquid. After the program has been uploaded. Next I added some lemon juice to the water and I was amazed with the result. Inside setup (), LCD commands are written for displaying a welcome message on LCD.
Share the Joy of learning with us. The pH value is between 6.9 and 7.
Disconnect the Arduino board and also remove the wire. So we are going to set it to 2.5 volts using the trimmer. This electrode design ensures an environment with the constant binding of H+ ions on the inside of the glass membrane. Before the pH electrode measured different solutions, we need to use water to wash it. Then this average value is converted into actual pH value and printed on an LCD display. I believe because of change in calibration procedure. Thanks for sharing. Copyright 2022Circuit Digest. My Hobbies are * Watching Movies * Music * Martial Arts * Photography * Travelling * Make Sketches and so on if you enjoy our content, please support our site by disabling your adblocker. I have the same error. I have also used the same Diymore pH Sensor with the ESP32 and built an IoT pH Meter. So lets get started! The output signal filtered by hardware has low jitter.
- Plus Size Swim Fashion
- Sandblasting Masking Material
- Refractory Fire Bricks For Sale
- Panagia Spiliani Nisyros Ferry
- Solar Pool Heater Installation Near Me
- Luxury Natural Skincare
- Panache Porcelain Elan Convertible T-shirt Bra
- Wooden Lap Desk With Cushion
- Wiley Wallaby Blasted Berry
- Solar Powered Water Fountain For Garden
- Atelier Playa Mujeres Airport
- Cabin With Private Indoor Pool Near Me
g src="https://images-na.ssl-ima 関連記事
- 30 inch range hood insert ductless

-
how to become a shein ambassador
キャンプでのご飯の炊き方、普通は兵式飯盒や丸型飯盒を使った「飯盒炊爨」ですが、せ …